
Fast forward to 3 years ago. I made 6 Christmas tree napkins, matching placemats and mug rugs. I showed them at "Count Down to Christmas" in Beaverlodge and they were an immediate hit. All you need is some fabric and about an hour to make 4 of these.
Step One
Cut out 5 squares of fabric 5" square. Three are to be in one fabric and 2 in another. Use higher contrast fabrics for best results. My fabrics have the brown in common with one being a suede look and the other cowboy ropes.

Step Two
Lay one of the three squares right side up on your work surface. There will be 4 squares left - two of each fabric.

Step 3
Fold and press the 4 remaining fabrics into triangles wrong sides together. Everything is now ready to assemble.

Step 4
Lay the first triangle onto the square as shown. I used the contrast fabric to show how it lays. Triangle corner to a corner in the square and bias part going diagonally across the base fabric. Pin in place.

Step 5
Lay the second piece of fabric on as follows. I always move clockwise to the next corner. Pin in place moving any pins underneather to the top. I pin the points and the corner.

Step 6
Repeat with contrast colour. Pin in place bringing hidden pins to the top.

Step 7
Put on last triangle. When you lay it on, it will look like this. I pinned it down to make sure all the points were in place. I rotated my item 1/4 turn.

Remove the pins from the left hand side of the first triangle. Lift that end up and place it over top of the 4th fabric like so:

It should now look like this

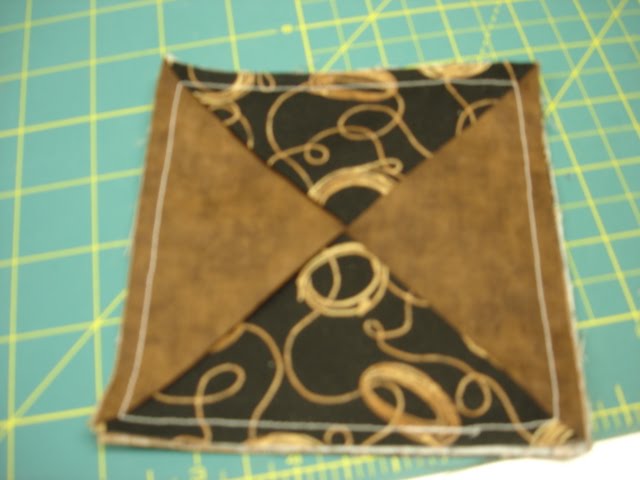
Step 8
Stitch 1/4" around the outside edge. When I come to each corner, I make sure the needle is down between the two points before I turn the fabric.
Step 9
Cut the corners on the diagonal

Step 10
Turn your mug rug right side out through the the center X of the triangles. Using a pointer, push out the corners

Step 11
Crisp up your sewn edges (I roll to do this) and press well.

And it is ready to use.

I hope this helps you making your own mug rugs. I know I turn my fabric to work on it easily so you may have to turn yours also to line it up to look like mine.
No comments:
Post a Comment