Sunday, October 31, 2010

And The Grande Finale from Ron Collins


The last technique Ron had for us that I could picture at the workshop was yokes. The process is very similar to the pocket process but here are a few ideas that I do and Ron approved of.

1. Sew the front and the back together wrong sides together at the should seams. Do not finish these seams. Press open as shown.


2. Cut a piece of Trace A Pattern so it goes up the body 3" from the highest part of the yoke. Stitch in place with 3/8" or 5/8" seam allowance. Notch where necessary and trim to 1/8".


3. Add Steam A Seam next to the bottom edge. Stitch shoulder seams together with right sides together. Press seams open.


4. Place on shirt matching the seam allowances. The seam allowances on the yoke will cover the seam allowances on the shirt. Pin in place matching up the seam allowances, front edges, etc. Pin in place. Lift up the edge of the yokes and remove the paper covering from the Steam A Seam. Press the yoke in place and it is ready to top stitch.

More Tips From Ron Collins


Ron showed us how to make perfect pockets that are rounded at the bottom. They look great on campshirts and some blouses but not on western shirts.

What you need:


Curved pocket template - 3 mm side of this template only


Steam a Seam 1/4" in width

What to do:
1. Cut pocket wider and longer than pocket pattern. Serge the top edge to finish and press ad shown.


2.Cut a piece of trace a pattern to fit the piece of fabric as shown. Draw on the straight lines with a pencil and use the pocket template to round the corners.


3. Stitch around the pocket on the drawn line. Trim seam allowance to 1/8" clipping the curves.


4. Iron on Steam A Seam close to the edge. Remove paper off the fusible strip.


5. Iron pocket on to shirt and top stitch down. Look carefully at how Ron did the stitching at the top of the pocket. Use edging foot on your sewing machine to get close to the edge of the pocket.


Sunday, October 03, 2010

Ron Collins Workshop Continued

Yesterday I worked on top stitching on a white western shirt that Miss Williams Lake Stampede Queen ordered. I spent a lot of time on the top stitching and only have the cuffs left to do. It was worth the time I spent doing the previous tutorial prior to doing the shirt.

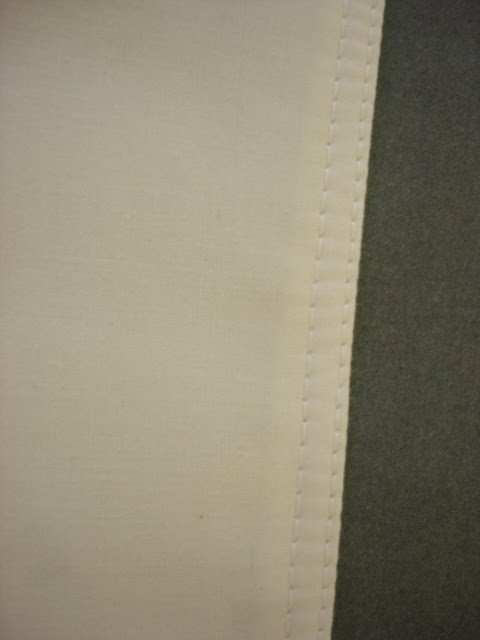
Top stitching on the collar:

This method takes a bit longer to do but it looks perfect on some of our shirts.

The other technique I worked on was new sleeve plackets. I have been doing continious laps. They have their place on shirts and blouses but I wanted to do those plackets you can find on ready to wear. I have spent a lot of time thinking about this technique and my favourite tutorial is this one:

http://www.timms.ca/kft/sew/sleevePlacket.html

It has a free template; the main reason I bookmarked it.

Ron Collins also loves this sleeve placket and we did a sample on Sunday. It is tailored and looks great on men's and some women's shirts. Though you can use the template from Kathleen Timm's page, we used an OPP Sandra Betzina pattern. And some of the steps are slightly different.

1. Cut out your placket pattern and mark it as shown below. Do not interface this piece as sometimes recommended.


You can see that there are a lot of lines on the pattern piece (very confusing) and how few we marked on the fabric piece. Two lines and the dot off by itself.

To get the dots, Ron pokes two or three holes in the pattern piece lays it on the fabric and uses his marking pen to allow the ink to flow through the holes onto the fabric. He clipped the bottom lines, turned them up so you can mark the bottom with two lines. Attach these dots to make a line using a ruler and pen.

Turn under 3/8" on the two sides and the top piece as shown. Press well with steam.

2. Place on the sleeve pattern with the right side of the placket to the wrong side of the shirt. The short side of the sleeve placket faces the back of the shirt and the long side to the front. Or as Kathleen says "the shorter side of the placket should be closest to the underarm edge".

3. Using a shorter stitch length, sew the placket to the sleeve by stitching on the stitching line, stopping and pivoting exactly on the dots.


3. Cut up the center of the stitching to 1/2" from the top angling into the corners. Cut right into the corners but do not cut the stitching.

4. Press the piece so the seam allowances are pressed towards the sleeve fabric so you can turn the placket to the right side. When you are happy with how it looks, give it a good press with steam.

5. Fold the short side over to cover the seam allowance and stitch close to the edge using a slightly longer stitch and the edge stitch foot.


Fold the longer side over and stitch it down going all the way up, around, and part way down the other side and across making a rectangular box.


The almost finished results:

Friday, October 01, 2010

Ron Collins Workshop


While at the Snip and Stitch last weekend, I learned several new techniques. The first one I am going to talk about is top stitching. I do top stitching using my 1/4" foot and Ron showed me how to use a couple of feet that I bought last winter and used for quilting. They are now deligated to my garment sewing drawer.

The two presser feet I now use for top stitching are the edging foot and the edge joining foot.

Edging Foot


Edge Joining Foot


When I am making western shirts, I do a lot of top stitching and usually only do one row of top stitching. This new technique lets me do two rows. Yes I need two presser feet but when it looks professionally done, changing those presser feet are worth it.

With the piece I am ready to top stitch, I do the following:

1. Set the stitch length to 3.5 on my Husqvarna SE or Diamond

2. Attach the Edge Joining foot

3. Set the needle to the far left and then move it right to 2.0


4. Put the edge of the fabric up against the flange and sew slowly keeping the fabric against the flange.


5. Attach the edging foot

6. Set the needle to center, stitch length at 3.5. and needle to the right to 2.0.


7. Place the edge of the fabric up against the flange and sew slowly keeping the fabric against the flange.


Finished sample:


Here is a picture of the classroom we worked in last weekend. Cozy to say the least but we all survived.