I love to make pillows and over the years I have decided I like the zipper in the back rather than in the top. It allows me to put binding on the pillow edge if I want to. The zippers I put in are exposed, which are okay, but I would rather like them to be hidden. I found a great tutorial on how to put them in that way. I will be trying this technique soon as I have a pillow to fix.
Put a zipper in your pillow tutorial by House on Hill Road from Erin Harris on Vimeo.

Tuesday, March 01, 2011
Monday, February 14, 2011
Placing Embroidery
I have learned the hard way how to place embroidery on our shirts. It is very different than when I do projects from embroidery club. But when you want to place embroidery on yokes and sleeves it requires some thought.
When I was down at the Snip and Stitch in Naniamo I looked at some items by Jenny Haskins. One item was paper that you print your design onto, cut it out to fit your hoop and then remove the backing and stick it where you wanted it. Well, the paper stuck like glue and it was horrid on satin fabrics. After much thought, I came up with this idea.
From my software (4D Professional) I print out what I have chosen or designed. The design I am working with is something I designed. I print two copies, the regular one and the mirrored version of it. Then I am off to my sewing room to get to work


This is my fabric, thread choice and my design for the yoke.
1. Using a ruler, extend the center lines horizontally and vertically so they go from edge to edge on the paper.

2. Lay the hoop onto the design lining up the hoop marks so it is in the proper position.

3. Trace around the inside of the hoop and remove hoop from the paper. Do not be too concerned if the hoop is longer than the paper at the top. The curves at the corners let you know that you must fit your paper at the bottom of the hoop first.

4.Cut out on the line you drew.

5. Lay your design onto the fabric. In this case, it is the sleeve of the shirt. I used a snip on the shirt as my center line measurement. I also measured how far up I wanted this design to be – 2” from cutting line to the bottom of the stem.

6. Carefully pin the pattern in place using your ruler to make sure it continues to be in the right place. I will put in the first pin and then measure up the sleeve on the center line making sure it is still 2” up from the edge.

7. I lay out the mirrored image above it making sure the center lines are lined up and the pattern is placed so the space between the two is approximately an inch. That is so I can put a few crystals between the two designs to link them together.

8. Pin the sides of the top design above the horizontal center line. Then take the bottom of the page and pin it to the top to get it out of the way.

9. Put you stabilizer into the hoop. I am using a soft cut away stabilizer. Spray it with a temporary adhesive.

10. Position the fabric onto the hoop so the paper pattern fits is perfectly. If the paper pattern is short, start at the bottom of the hoop and set it in so it fits as far up as it goes.

11. Carefully lift back the sides of the paper and pin the fabric to the stabilizer close to the hoop edge.

12. Attach the hoop to the embroidery unit and set up the design on your sewing machine. I had already turned on my machine and calibrated it prior to starting my project. I had the design up and ready to push the “Go” button.

13. Get your machine ready so you can align the needle to the cross hairs. You are getting your design centered. My machine allows me to move the needle in small increments so I can get it perfect. In this picture, the needle is not quite centered and I centered it after I snapped the picture.

14. Remove the paper design. As my fabric is not hooped but held on with a temporary adhesive, I like to fix it into place (Fix on my machine). I will stop my machine and remove the two side pins if my needle gets close to them. Then it is time to stitch out the design.

15. The first part of the total design is done.

16. Trim the stabilizer close to the stitching on the back.

17. Repeat the process by laying the piece of paper flat on the fabric and pinning it in place. Repeat the above process. Trim the stabilizer when done and admire the front.

I will show you tomorrow how to mirror the image on the other sleeve. The set up is easy once I figured it out. Then it will be on to the yokes.
Saturday, February 05, 2011
The Piper
Gwensews wrote That's a great technique. I'm interested in how you will get the piping around the point and the bottom of the shirt attached without any rippling when referring to how I do my curvy yokes. Here is the process of how I do the piping. It is my way and it might not be the right way or the way other folks do it.
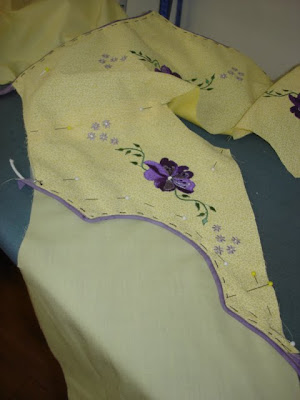
I have custom made this piping. I cut the strips 2" wide on the bias, pressed it in half lengthwise, stuffed the cording in and stitched it closed with a piping foot. As I am stuffing in the cording, I press it close to the folded edge with a fingernail. I cut my piping back to 1/4" seam using a piping ruler.
I lay the piping around the curved edges pinning as I go. At sharp corners, I play with the piping, folding it into a V so the point of the yoke fits into the piping. I pin it carefully into place and baste it down.

Here is the wrong side where I formed the point for the center back. If necessary, I will do small basting stitches at the point to hold the piping securely in place.

The back is basted.

Here is the wrong side of the front yoke.

And the yokes are done and laid out. I will sew the shoulder seams on the yokes next and press them open.

I then work on the shirt by sewing the shoulder seams together wrong sides together. Yes, the seams are on the right side of the shirt as you can see in the next two photos.


I put the yoke onto the shirt matching in the following order:
*Shoulder seams at neck and sleeve.
*At shirt front
*Around the yokes
*Around the neck
I do a lot of hand smoothing and pinning and it looks like this when I am done.
The wrong side after I have pinned

All pinned and ready to sew.

I sew around the neckline with a 1/2" seam. This holds the top together and I don't loose the pins I put in. I learned that after having most of the pins fall out as I was sewing on the yokes.
Next I put on my piping foot (but I have used my zipper foot) and set the length to 3.0 and move the needle out 2 steps on my machine. I slide the piping into the piping foot with the line on it at the edge of the yoke. With the zipper foot, I put the edge of the zipper foot at the edge of the yokes. I sew slowly to keep the foot in position.

When I get to a point, I stop with the needle down.....

pivot and continue sewing.

Stitching on the inside.....

and the outside

And hung up ready for the button bands to be added.

I have custom made this piping. I cut the strips 2" wide on the bias, pressed it in half lengthwise, stuffed the cording in and stitched it closed with a piping foot. As I am stuffing in the cording, I press it close to the folded edge with a fingernail. I cut my piping back to 1/4" seam using a piping ruler.
I lay the piping around the curved edges pinning as I go. At sharp corners, I play with the piping, folding it into a V so the point of the yoke fits into the piping. I pin it carefully into place and baste it down.

Here is the wrong side where I formed the point for the center back. If necessary, I will do small basting stitches at the point to hold the piping securely in place.

The back is basted.

Here is the wrong side of the front yoke.

And the yokes are done and laid out. I will sew the shoulder seams on the yokes next and press them open.

I then work on the shirt by sewing the shoulder seams together wrong sides together. Yes, the seams are on the right side of the shirt as you can see in the next two photos.


I put the yoke onto the shirt matching in the following order:
*Shoulder seams at neck and sleeve.
*At shirt front
*Around the yokes
*Around the neck
I do a lot of hand smoothing and pinning and it looks like this when I am done.

The wrong side after I have pinned

All pinned and ready to sew.

I sew around the neckline with a 1/2" seam. This holds the top together and I don't loose the pins I put in. I learned that after having most of the pins fall out as I was sewing on the yokes.
Next I put on my piping foot (but I have used my zipper foot) and set the length to 3.0 and move the needle out 2 steps on my machine. I slide the piping into the piping foot with the line on it at the edge of the yoke. With the zipper foot, I put the edge of the zipper foot at the edge of the yokes. I sew slowly to keep the foot in position.

When I get to a point, I stop with the needle down.....

pivot and continue sewing.

Stitching on the inside.....

and the outside

And hung up ready for the button bands to be added.

Thursday, January 06, 2011
The Basic White Shirt

Yesterday we got an order for 4 white western shirts. Our daughter's comment was "you sure got to love white to order that many white shirts". Though these are western shirts it had me thinking about patterns for basic white shirts for anyone to wear.
My first pick would be our western shirt pattern without the front or back yokes. This pattern has a 2 piece collar and a nice button band. The cuffs are average in size. The body could be left straight, have the sides curved in, or vertical darts added to the front or back. A person could put a V neck pullover over top of this shirt and look classy, roll up the sleeves, or use a necklace or clip bracelet to make a statement if worn to the office with a classic skirt or trousers. Unfortunately I do not have a picture of picture of this shirt even though I have made 2 horsemanship shirts that followed this design.
Some pattern ideas that would make great white shirts has been dancing through my head. What are my choices if I didn't use the western shirt pattern?
Vogue 8689

This is a very simple shirt with horizontal yoke lines, princess seams, 2 piece collar, and an average sized cuff. Great for a good basic shirt that has different sleeve variations included.
Vogue 8598

Another simple shirt that has no yokes, princess seams, 2 piece collar, and an averaged sized cuff. Another great basic shirt pattern that has variations included.
McCalls 4079

The ultimate and long lived Palmer Pletch basic shirt. A bit boxy in the body, it has a back yoke, basic sleeves and cuffs, and a 2 piece collar.
There are a lot of other nice patterns out there for a white shirt but they are not basic - the sleeves do not have plain cuffs on them. I feel plain cuffs is one criteria for a basic white shirt.
This morning I came across this article from Dlish Couture http://www.dlishcouture.com/2010/04/20/tips-on-wearing-buttons-downs-from-creative-director-of-banana-republic/ that I thought was perfect for today. Strangely enough, I recommend to our customers what Simon Kneen has said.
Allure’s April 2010 issue addressed how to wear a white shirt. For the article, the magazine interviewed Simon Kneen, the creative director for Banana Republic. Here is what he said:
Every woman should have at least one really good white shirt in her closet. It’s a staple she can mix into her wardrobe year after year. Here’s how:
Get the right fit. A white shirt is simple and unadorned by definition, so its best to choose one made of a high-quality fabric…Choose one that is neither skintight nor baggy; it should just skim the body. And be sure to sit down in the dressing room. If the shirt then gaps at the bust or hips, you need to go up one size.
Pair it well. If you’re wearing the shirt with a skirt or classic pants, it looks best tucked in; with skinny jeans, try it untucked. Rolling up your sleeves to a point just below or above the elbow is a great casual look, but make sure you won’t need to roll them back down since wrinkling is inevitable. If you throw on a sweater, make sure it’s a v-neck that’s low enough that you can still unbutton the second button of the shirt-otherwise it can look fussy.
Dress it up. All that crisp white cotton is a great blank canvas for accessories, but that doesn’t mean you should pile them on. Stick to one piece, like a statement necklace or a great cuff.
Handle with care. You should launder white shirts, but don’t dry clean them- the chemicals can cause yellowing. The gentlest treatment is to wash them at home in cold water and hang them to dry; you can always have them professionally pressed rather than ironing them yourself. No matter how careful you are, lotion, fragrances, and perspiration will inevitably lead to discoloration over time. If your white shirt is even the slightest bit dingy, its time to say good-bye, so when you find one you love, consider buying two.
And buying two could mean making two.
Wednesday, December 08, 2010
Mug Rugs
One item I learned to make about 14 years ago is Mug Rugs. It was an impromptu learning lesson in a quilting shop. I think I made a few for Christmas presents that year and put a sample away for future reference.
Fast forward to 3 years ago. I made 6 Christmas tree napkins, matching placemats and mug rugs. I showed them at "Count Down to Christmas" in Beaverlodge and they were an immediate hit. All you need is some fabric and about an hour to make 4 of these.
Step One
Cut out 5 squares of fabric 5" square. Three are to be in one fabric and 2 in another. Use higher contrast fabrics for best results. My fabrics have the brown in common with one being a suede look and the other cowboy ropes.

Step Two
Lay one of the three squares right side up on your work surface. There will be 4 squares left - two of each fabric.

Step 3
Fold and press the 4 remaining fabrics into triangles wrong sides together. Everything is now ready to assemble.

Step 4
Lay the first triangle onto the square as shown. I used the contrast fabric to show how it lays. Triangle corner to a corner in the square and bias part going diagonally across the base fabric. Pin in place.

Step 5
Lay the second piece of fabric on as follows. I always move clockwise to the next corner. Pin in place moving any pins underneather to the top. I pin the points and the corner.
Step 6
Repeat with contrast colour. Pin in place bringing hidden pins to the top.

Step 7
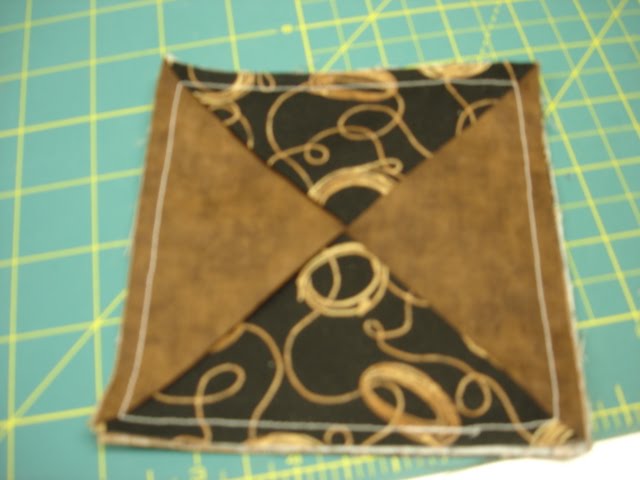
Put on last triangle. When you lay it on, it will look like this. I pinned it down to make sure all the points were in place. I rotated my item 1/4 turn.

Remove the pins from the left hand side of the first triangle. Lift that end up and place it over top of the 4th fabric like so:

It should now look like this

Step 8
Stitch 1/4" around the outside edge. When I come to each corner, I make sure the needle is down between the two points before I turn the fabric.

Step 9
Cut the corners on the diagonal

Step 10
Turn your mug rug right side out through the the center X of the triangles. Using a pointer, push out the corners

Step 11
Crisp up your sewn edges (I roll to do this) and press well.

And it is ready to use.

I hope this helps you making your own mug rugs. I know I turn my fabric to work on it easily so you may have to turn yours also to line it up to look like mine.
Fast forward to 3 years ago. I made 6 Christmas tree napkins, matching placemats and mug rugs. I showed them at "Count Down to Christmas" in Beaverlodge and they were an immediate hit. All you need is some fabric and about an hour to make 4 of these.
Step One
Cut out 5 squares of fabric 5" square. Three are to be in one fabric and 2 in another. Use higher contrast fabrics for best results. My fabrics have the brown in common with one being a suede look and the other cowboy ropes.

Step Two
Lay one of the three squares right side up on your work surface. There will be 4 squares left - two of each fabric.

Step 3
Fold and press the 4 remaining fabrics into triangles wrong sides together. Everything is now ready to assemble.

Step 4
Lay the first triangle onto the square as shown. I used the contrast fabric to show how it lays. Triangle corner to a corner in the square and bias part going diagonally across the base fabric. Pin in place.

Step 5
Lay the second piece of fabric on as follows. I always move clockwise to the next corner. Pin in place moving any pins underneather to the top. I pin the points and the corner.

Step 6
Repeat with contrast colour. Pin in place bringing hidden pins to the top.

Step 7
Put on last triangle. When you lay it on, it will look like this. I pinned it down to make sure all the points were in place. I rotated my item 1/4 turn.

Remove the pins from the left hand side of the first triangle. Lift that end up and place it over top of the 4th fabric like so:

It should now look like this

Step 8
Stitch 1/4" around the outside edge. When I come to each corner, I make sure the needle is down between the two points before I turn the fabric.
Step 9
Cut the corners on the diagonal

Step 10
Turn your mug rug right side out through the the center X of the triangles. Using a pointer, push out the corners

Step 11
Crisp up your sewn edges (I roll to do this) and press well.

And it is ready to use.

I hope this helps you making your own mug rugs. I know I turn my fabric to work on it easily so you may have to turn yours also to line it up to look like mine.
Subscribe to:
Comments (Atom)