Karen from Stitchers Guild showed the cuff she used on the a shirt she recently made. She used Pamela Erny’s tutorial for a wrapped cuff that I am going to do on a shirt for the Spousal Unit someday. Where Pamela has stripes, I will have the plain fabric; one front placket, inner collar band, sleeve placket, and the under cuff.

Sunday, February 05, 2012
Tuesday, January 03, 2012
Custom Made Shirts
When our son visited us, he gave me his first custom made shirt which was like winning the lottery. There is much to be learned from this shirt in the area of shirt making. He also let me take pictures and trace two of his other shirts. These shirts fit him perfectly and the fabric is to die for.
Shirt #1 is either an Italian cotton or a linen cotton blend. It has a gorgeous hand even though it wrinkles. But the wrinkles aren’t ugly and they seem to smooth out while being worn. The feature of this shirt is the cuffs and collar band.
The cuffs have this dark brown piece added and they look so smart when the shirt is worn. I traced the cuff to get the exact measurements.

The collar band is solid coloured on the outside. When worn you just see it. The tailor also did the inside of the button bands with the plain fabric though you didn’t see them unless the top buttons were left open. I thought it was such a neat idea that added a different element to this shirt.

This tailor sews the buttons on using an X design with the thread.
Shirt #2 was bought in a shop in Toronto. It is a high end cotton that has a very subtle sheen to it. This shirt is imported but the store still does alterations on them for clients. The unique feature of this shirt is the collar.

There is a second collar sewn to the under collar prior to it being sewn to the top collar and then to the collar band. The white stitching on this collar is sewn down to under collar after the button hole is sewn in.

When the collar is buttoned down, you don’t see the buttons on top of the collar. Very unique. The inside collar band and the yoke lining are made of the same fabric as the second collar piece. The second unique item of this shirt was the hem. The fronts and back were hemmed prior to sewing up the side seams. This allows the tailor to alter the shirt without taking out the hem. The buttons have the name of the company printed on them.
On both shirts, the sleeves were inserted using a flat felled seam that is 1/2 – 5/8” in depth. The side seams are very tiny flat felled seams. The hems are tiny also. I learned so much about expensive shirts and will be applying some of them to the shirts I make for the Spousal Unit.
Shirt #1 is either an Italian cotton or a linen cotton blend. It has a gorgeous hand even though it wrinkles. But the wrinkles aren’t ugly and they seem to smooth out while being worn. The feature of this shirt is the cuffs and collar band.
The cuffs have this dark brown piece added and they look so smart when the shirt is worn. I traced the cuff to get the exact measurements.

The collar band is solid coloured on the outside. When worn you just see it. The tailor also did the inside of the button bands with the plain fabric though you didn’t see them unless the top buttons were left open. I thought it was such a neat idea that added a different element to this shirt.

This tailor sews the buttons on using an X design with the thread.
Shirt #2 was bought in a shop in Toronto. It is a high end cotton that has a very subtle sheen to it. This shirt is imported but the store still does alterations on them for clients. The unique feature of this shirt is the collar.

There is a second collar sewn to the under collar prior to it being sewn to the top collar and then to the collar band. The white stitching on this collar is sewn down to under collar after the button hole is sewn in.

When the collar is buttoned down, you don’t see the buttons on top of the collar. Very unique. The inside collar band and the yoke lining are made of the same fabric as the second collar piece. The second unique item of this shirt was the hem. The fronts and back were hemmed prior to sewing up the side seams. This allows the tailor to alter the shirt without taking out the hem. The buttons have the name of the company printed on them.
On both shirts, the sleeves were inserted using a flat felled seam that is 1/2 – 5/8” in depth. The side seams are very tiny flat felled seams. The hems are tiny also. I learned so much about expensive shirts and will be applying some of them to the shirts I make for the Spousal Unit.
Thursday, December 22, 2011
A Few Of My Favourite Things
I went looking at my pictures and saw this collage I had put together showing the clothing I had made from Oct 1, 2010 to October 31, 2011. It isn’t every thing I had made, just my favourite pieces.

The two dresses on the bottom are minus the crystals and they still look great.
Friday, December 16, 2011
Fabric Gift Bags
These Christmas gift bags are so much fun to make though they do take time. I really like the fact they can be used every year.

I first learned out to make these bags at Embroidery Club a couple of years ago. The bag was for a wine bottle and I ended up adapting it to get a gift bag. I don’t do the embroidery any more and won’t unless it is a gift for a special person.
For these bags you will need:
- 2 – 13” squares of printed fabric (Christmas or otherwise)
- 2 – 13” squares of light weight interfacing
- 2 – 4 x 13” rectangles for the cuff of the bag. It can be plain, marbled, or a small print.
- 2 – 4 x 13” rectangles of light weight interfacing
- 2 – 13 x 16.5” rectangles of lining fabric (I use broadcloth)
- 2 – 13 x 16.5” rectangles of light weight interfacing
I cut this bags lining and interfacing only 16” for a small amount of the cuff turned to the inside of the bag. - ribbon
- Optional 2 – 1 x 13” pieces of a contrasting fabric ( will make the bag with them this time)

Iron the interfacing on to all the pieces of the bag. Trim interfacing that shows if necessary.
Fold the 2 pieces of 1 x 13” pieces in half so they are 1/2” x 13”.

Lay the long thin pieces onto the cuffs with raw edges to raw edges. Pin into place and stitch 1/8” from raw edge.

Pin the raw edge of the stitched piece to the top of the bag making sure any print is going in the right direction. Stitch in place using a 1/4” seam. Press seam allowance up to the cuff.

Mark the button hole in the center of one piece. I marked 1” from the seam line and then marked the button hole up 1/4” from that line.

Stitch the button hole starting at the bottom of the top line. My button hole is 13 mm and they can be as long as 15 mm. Snip the button hole open. I apply Fray Block prior to cutting the button hole open. Your choice.

Pin one side together making sure the cuffs and the little trim match nicely. Sew with 1/4” seam allowance. Press the seam open. Repeat with the other side.

Pin the bottom together and sew a 1/4” seam from the stitching line to the stitching line of each side seam. Do not sew the piece of seam allowance that is a single layer.

Press the bottom seam allowance open. Next take the side seam and bottom seam and match them up to make a triangle. Pin through both the seams and smooth out so there are no folds on both sides.

Using a 6” ruler and the 45 degree lines, have the triangle of the fabric match up to the triangle on the ruler.

I use a chalk liner to make a stitching line across the the base of the triangle. As you can see I have set the line coming down the seam at 3” but you can do 2” or 2.5” if you wish. Sew across the chalk line. I do both of these at the same time.

Fold and press the stitch line so the triangle flips up the side seam.

Your outer bag is done. The lining is done the same way except you do not add a cuff at the top and you leave an opening in one of the side seams. That is where you will turn your bag to the right side.

Both the lining and outer bags are done. Have the lining turned inside out.

Take the outer bag and put into the lining. Match up the side seams and pin around the top. Stitch the tops of the two bags together with a 1/4” seam.

Pull the outer bag through the opening in the lining so both bags are now right side out.

I press the joining seam towards the outer bag. Push the lining into the outer bag and arrange to fit. Mine had a bit of the cuff on the inside (just trying something new).

I used a quilting marker on my sewing machine and stitched 1” down on the print of the outer bag. I then used my ditch foot to sew in the ditch where the print meets the cuff. This makes a casing for the ribbon.

At the top of the cuff, I top stitched 1/4” down. I ladder stitch the opening in the lining to close it up neatly. Then I threaded a ribbon through the button hole to tie the bag shut.

Monday, November 21, 2011
Cabbage Rolls
We had those yummy cabbage rolls last night. They are not the ones in which you use a tomato based sauce to cook them in. Nor does the meat have rice in them. Many years ago (1984 I think) a friend gave me her recipe.
Crush the Stove Top Dressing until it coarse. Set aside 1/4 cup for sauce if you wish to. Mix all ingredients into a bowl and let sit to blend the flavours.
Make sure the cabbage water broth is hot and dissolve chicken bullion cube in it.
Melt butter in a pot. Add flour and cook for a minute or two. Add liquid and stir until thick. Add cream of celery soup. If the sauce is too thick add more cabbage liquid. You can stir in the Stove Top Dressing if you want to.
To Assemble:
Mix 1/4 cup meat stuffing in each leaf. Roll and tuck the cabbage leaf around and place into a large 9 x 13” pan. You might need a smaller pan also. Pour the sauce over the cabbage rolls and cover with foil. Bake at 350F for 1 1/4 hours. Remove and skim off fat if necessary. Spoon on 1 cup sour cream, sprinkle with paprika and bake 15 minutes longer. (We do not do this step – personal choice).
If you feel that you have enough for 2 meals, divide into 2 equal size baking dishes, cook one and refrigerate the other. Do Not Freeze.
Country Cabbage Rolls
Cabbage- simmer in a pot of water to wilt. Drain reserving the 1.5 to 2 cups water. You will need 16 to 20 leaves.
| 3/4 lb. ground pork | 1 lb. lean hamburger |
| 2 medium eggs | 1 box Chicken or Turkey flavoured Stove Top Dressing |
| 1 clove garlic chopped finely | 1 medium onion chopped finely |
| 1/4 cup butter or margarine | 1/4 cup flour |
| 1.5 cups cabbage water broth | 1 chicken bullion cube |
| 1 can cream of celery soup |
Melt butter in a pot. Add flour and cook for a minute or two. Add liquid and stir until thick. Add cream of celery soup. If the sauce is too thick add more cabbage liquid. You can stir in the Stove Top Dressing if you want to.
To Assemble:
Mix 1/4 cup meat stuffing in each leaf. Roll and tuck the cabbage leaf around and place into a large 9 x 13” pan. You might need a smaller pan also. Pour the sauce over the cabbage rolls and cover with foil. Bake at 350F for 1 1/4 hours. Remove and skim off fat if necessary. Spoon on 1 cup sour cream, sprinkle with paprika and bake 15 minutes longer. (We do not do this step – personal choice).
If you feel that you have enough for 2 meals, divide into 2 equal size baking dishes, cook one and refrigerate the other. Do Not Freeze.
Cuff Tutorial
Sunday was cooler than Saturday by a lot. Enough that people in the higher levels couldn’t start their trucks if they weren’t plugged in. We are suppose to warm up some though. Let’s wait and see though as the forecast could be wrong.
Yesterday morning I let out the darts on the blue blouse and shortened them by 4”. That gave Queen Emma more room she needed through the hips.
When I was down in Nanaimo, Ron Collins talked to me about the flap on the pockets of the Spousal Unit’s shirt. I was not to worry about the depth of the seam allowances and to focus on matching the bias to the shirt. I never transferred that thought to the cuffs until I watched Ron do it on the DVD #10 Shirts and Blouses. All my fussing about the cuffs was solved. I made sure the sleeves opening was the same for both sleeves and then proceeded.
1. Pin the cuff onto the sleeve leaving about 3/8 to 1/2” seam allowance on the one end and pinning around.
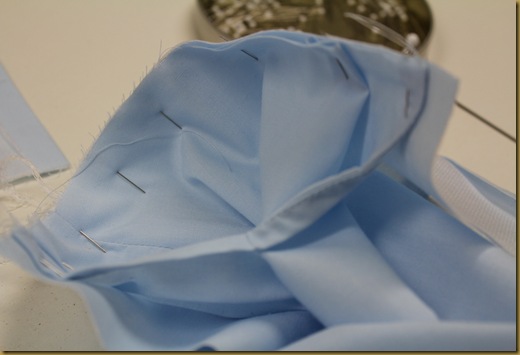
2. Sew the cuff on, trim the seam and press the seam towards the cuff. Notice I have turned under 5/8” at the other edge of the cuff.
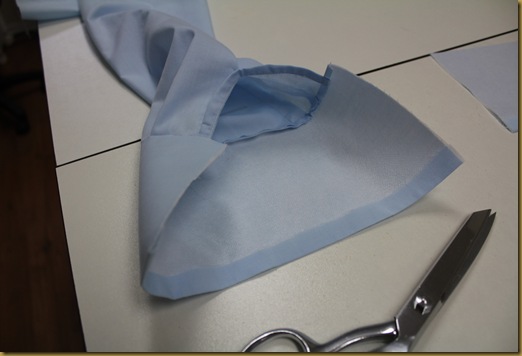
3. Pin the cuffs together so the folded edge is slightly lower than the stitched edge. This is so the folded edge will cover the seam when turned.
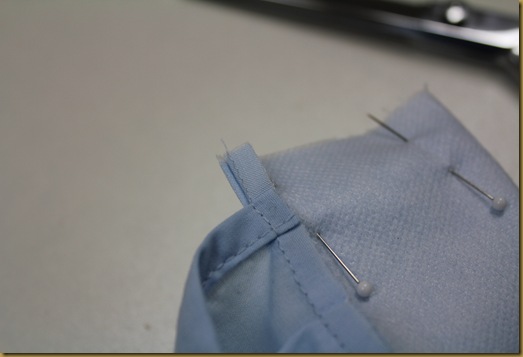
4. Using a ruler to help you, mark the stitching line where you have pinned. It should be a couple of threads away from the continuous lap for the turn of cloth.

5. Stitch on the marked line, cut at top on an angle and trim the seam allowance to about 1/4”. Press open.

6. Turn the cuff and press so it is nice and neat. I put Steam-A-Seam on the folded edge and when I am ready to do the final pressing of the cuff, I remove the paper covering and press it into place. Stitch close to the edge using an edging foot.

7. The finished cuff.

I then inserted one sleeve and didn’t need to worry about adjusting the sleeve cap. It looks might good.
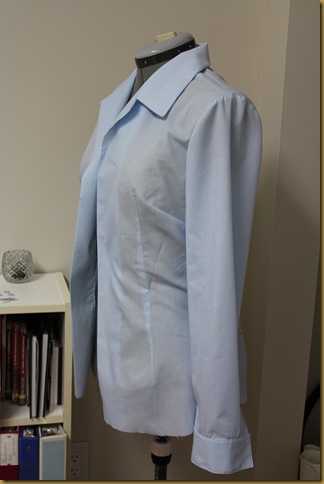
Wrinkled and I know I need to do a couple of adjustments to the side seams prior to finishing this blouse.
Until tomorrow..................
Yesterday morning I let out the darts on the blue blouse and shortened them by 4”. That gave Queen Emma more room she needed through the hips.
When I was down in Nanaimo, Ron Collins talked to me about the flap on the pockets of the Spousal Unit’s shirt. I was not to worry about the depth of the seam allowances and to focus on matching the bias to the shirt. I never transferred that thought to the cuffs until I watched Ron do it on the DVD #10 Shirts and Blouses. All my fussing about the cuffs was solved. I made sure the sleeves opening was the same for both sleeves and then proceeded.
1. Pin the cuff onto the sleeve leaving about 3/8 to 1/2” seam allowance on the one end and pinning around.

2. Sew the cuff on, trim the seam and press the seam towards the cuff. Notice I have turned under 5/8” at the other edge of the cuff.

3. Pin the cuffs together so the folded edge is slightly lower than the stitched edge. This is so the folded edge will cover the seam when turned.

4. Using a ruler to help you, mark the stitching line where you have pinned. It should be a couple of threads away from the continuous lap for the turn of cloth.

5. Stitch on the marked line, cut at top on an angle and trim the seam allowance to about 1/4”. Press open.

6. Turn the cuff and press so it is nice and neat. I put Steam-A-Seam on the folded edge and when I am ready to do the final pressing of the cuff, I remove the paper covering and press it into place. Stitch close to the edge using an edging foot.

7. The finished cuff.

I then inserted one sleeve and didn’t need to worry about adjusting the sleeve cap. It looks might good.

Wrinkled and I know I need to do a couple of adjustments to the side seams prior to finishing this blouse.
Until tomorrow..................
Tuesday, November 08, 2011
Setting in Sleeves
They sky looked like snow yesterday morning when we got up. By the time it was light outside it was snowing. Just enough to cover the ground and disappear in the afternoon. No one was singing “Let it Snow”.
The Spousal Unit sealed the clear plywood ceiling in the master bedroom yesterday morning. He put on the second coat after lunch. Windows were opened and a fan was running but we still smelled some fumes. By dinner time, he had half of the bedroom closet framed in. A good day’s work. He will continue working in there today.
For the first part of the morning I worked on the jacket. I did photograph putting in the sleeves. These are the instructions that Ron Collins gave us when I was in Nanaimo in late September. Here is what I did with the instructions I wrote down after doing this with Ron.
1. Sew side seams of sleeves.
2. Cut Tailor’s Pride (horsehair canvas) 1 1/4” wide on the true bias.

3. Starting at notch, put strip 1/16” from edge and needle about a fat 1/2” from edge of sleeve.

4. Back stitch to hold strip in place. If your pressure foot lifts up like mine does, turn this feature off so the pressure foot holds everything tight when you stop.
5. Pull the strip hard and sew 1 to 1 1/2”. Stop, Pull again.
6. Stop pulling 1/2” before and after the center dot (which I had snipped).
7. Continue pulling the strip and sewing to the last notch. Back stitch to secure.
8. Insert sleeve into jacket pinning it into place. I matched up the shoulder and under arm seams and all the markings I had transferred from the pattern. I used a lot of pins.

9. Stitch the sleeve into the jacket with the sleeve closest to the feed dogs to ease in the sleeve. I start from the shoulder seam and go around. I also use the free arm on my machine as it is easier to control the fabric.

10. Double stitch from back to front notches under the arm. Trim that piece to 1/4”. I stitched a little less than a 1/4” from the seam though I will double stitch the next time. Both ways work.

11. Where the sleeve waves from the gathering

Cut V’s out of the sleeve only so it lies flat.

12. I finger pressed the canvas to the sleeve prior to pressing it with the iron.


I was going to do a sleeve wrap also but ended up not doing it. After asking about it, I thought it would be overkill.
I got to thinking that I had seen a YouTube video on this so I searched for it. Gertie's New Blog For Better Sewing had the video so I added it here.

She is using a wool/mohair fabric and she does not notch the fullness out of the sleeve when she is done. Otherwise it is the same as what Ron showed.
Today I am going to start a blouse that will be worn under the above jacket. I felt some pressure to finish the jacket last night and do the blouse today. But I did not feel stressed. That is good as I do not plan on going down that trail again.
On top of it all, a girl pre ordered her dress for next year’s Miss Rodeo Canada competition. That is one of my limited number of spaces filled.
Until tomorrow.................
Subscribe to:
Posts (Atom)